
[ad_1]
Apple’s upgraded cloud service, iCloud+, is set to be released as part of iOS 15, iPadOS 15 and macOS Monterey, offering a few key privacy-focused upgrades for paying subscribers. Bundled as part of the standard iCloud subscription, iCloud+ introduces Private Relay – which essentially works as a VPN – and Hide My Email.


The latter has been available as part of the Sign In With Apple service for the past few years, providing a randomly generated alias email address to submit to sites and services in place of your real email address, but it’s taken to the next level in iOS 15.
Rather than being limited to just Sign In With Apple, you’re able to create a number of alias emails using Hide My Email on your iPhone. You’ll be able to submit these email addresses in place of your real email, get all messages forwarded to your primary email address, and if you decide they become annoying, you can simply deactivate the alias.
The feature will be released with iOS 15 in September, but if you’re running the iOS 15 public beta, you can give it a spin right now. Here’s how.
How to create an alias email address using Hide My Email
If you’re subscribed to iCloud – and therefore iCloud+ – and you’ve got iOS 15 installed on your iPhone, here’s how to create an alias email address using Hide My Email.
Open the Settings app on your iPhone.
Tap your Apple ID at the top of the main menu.
Tap iCloud.
Tap Hide my email.
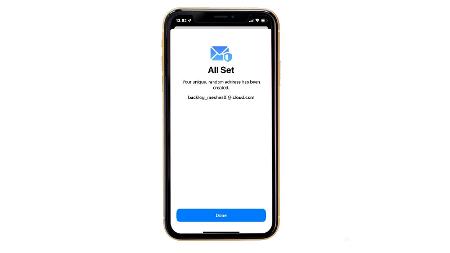
Tap Create new address.
You’ll then see your new email address appear on screen. Tap Use different address if you want to generate a different address, and add an identifying label – i.e., deals if it’s for deal newsletters – and make a note about the address if required too.
Tap Next.
Tap Done.
You’re all done! You can now provide the random email address when signing up to websites in Safari, and you can send emails using the alias in the Mail app too.
How to deactivate an email address using Hide My Email
If you want to stop receiving emails from an alias created using Hide My Email, it’s easy to deactivate it.
Open the Settings app on your iPhone.
Tap your Apple ID at the top of the main menu.
Tap iCloud.
Tap Hide my email.
Tap the email address you’d like to deactivate.
Tap Deactivate email address at the bottom of the screen.
Tap Deactivate to confirm.
If you change your mind in future and want to re-enable the email alias, simply navigate back to the Hide My Email menu, tap Inactive addresses, tap the alias in question and tap Reactivate address.
How to change the Hide My Email forwarding address
If you change your primary email address in future, or simply want to change the email address that emails are forwarded to, follow these steps:
Open the Settings app on your iPhone.
Tap your Apple ID at the top of the main menu.
Tap iCloud.
Tap Hide my email.
Scroll to the bottom of your list of alias email addresses and tap Forward to.
Select one of the email addresses linked to your iPhone, and tap Done.
For more on the upcoming software update, take a look at all you need to know about iOS 15.
Related content
[ad_2]
Source link
